How To Use Momcozy M9 Mobile Flow
If you’re new to the Momcozy M9 Mobile Flow, then you’ve probably realized that there is a bit of a learning curve, especially if you’re new to pumping milk. But that’s why you’re here!
In my step-by-step guide I am going to walk you through everything you need to know about to use Momcozy M9 pump. From how to assemble the Momcozy M9 pump to how to connect to the Momcozy App. So, let’s get started on learning to use your Momcozy M9 pump like a pro!
- If you prefer to watch your how to guides, there’s a video how to guide right below. Then, you can skim the written guide for more details.
- If you prefer to read your how to guides, scroll past the video, and you’ll find my written guide.
Editor’s note: Pumping Milk is reader-supported, meaning, at no cost to you, I may earn a commission if you buy after clicking an affiliate link. Learn More.
Momcozy M9 Inclusions
With every pump you receive, whether you purchase new or second hand, I highly recommend that you get to know all the different breast pump parts for your pump. This is to ensure that you have everything you need on hand to set up and start using your new pump effectively.
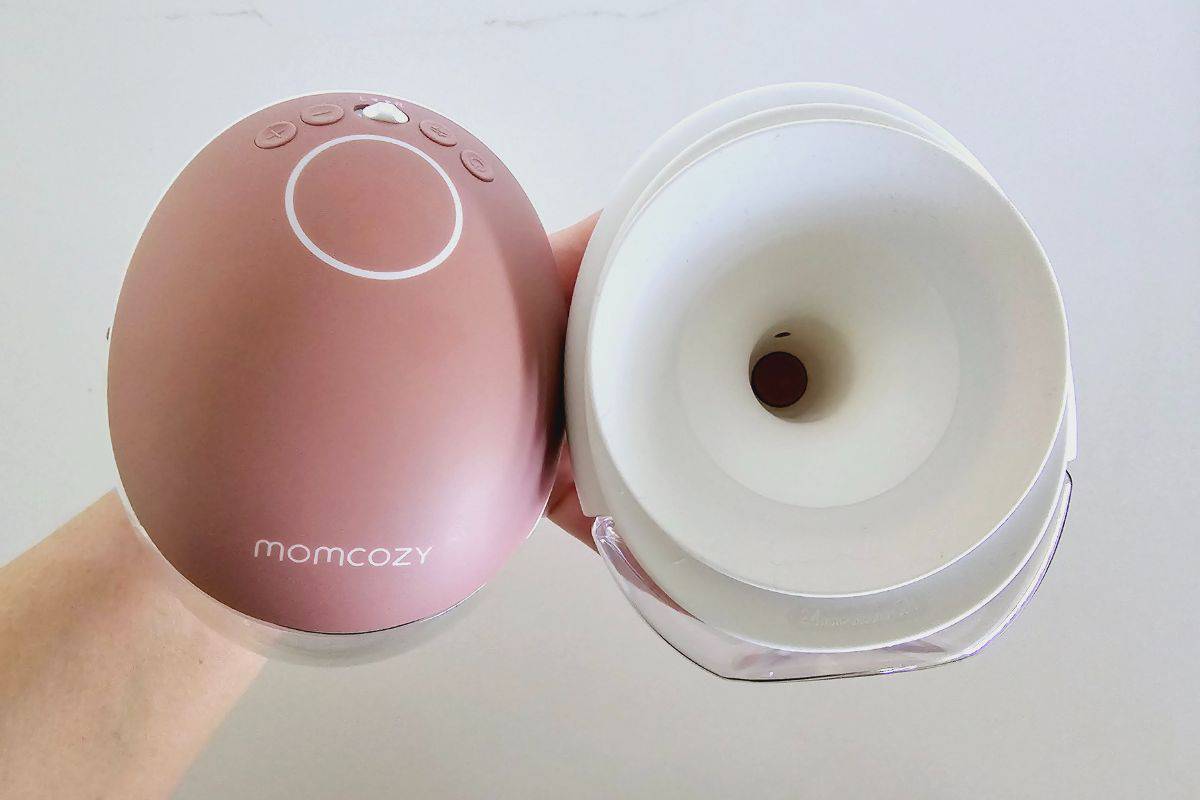
Photo credit: Pumping Milk
For the Momcozy M9 pump, when purchased new, included in your box is:
Double Wearable Pump Kit
- 17mm Flange Insert* 2
- 19mm Flange Insert* 2
- 21mm Flange Insert* 2
- 24mm Flange* 2
- Diaphragm (Double Layered)* 2
- Valve * 4
- Pump Motor * 2
- Milk Container with Lid (150ml) * 4
- USB Type-C Cable * 2
- Storage Box *1
- Flange Cover*2
- Flange Size Ruler *1
I highly recommend taking a minute to double-check that everything you need is included in your package. If you brought your pump new and anything’s missing or damaged, don’t hesitate to contact Momcozy’s customer service to get it sorted.
If you’re using a pre-loved M9 pump, make sure you thoroughly inspect all the parts to ensure they’re in good condition.
I do recommend at a minimum replacing key pieces like valves, diaphragms, and flange inserts to ensure efficiency. These parts should be changed every 1-3 months regardless, so starting with new pieces also helps you keep track of your pump maintenance schedule rather than guessing.
You may also want to consider replacing your flanges too, however these only need to be replaced every 6 months or so based on usage, so it is not as vital as your valves and diaphragm unless damaged.
While it may seem like an extra expense, replacing parts such as valves, membranes, flanges, and shields is crucial for keeping your pump running smoothly and maintaining cleanliness.
Lastly, make sure your flange size is the right fit for your nipple. If you have smaller nipples, you might need to purchase additional inserts to get the perfect fit.
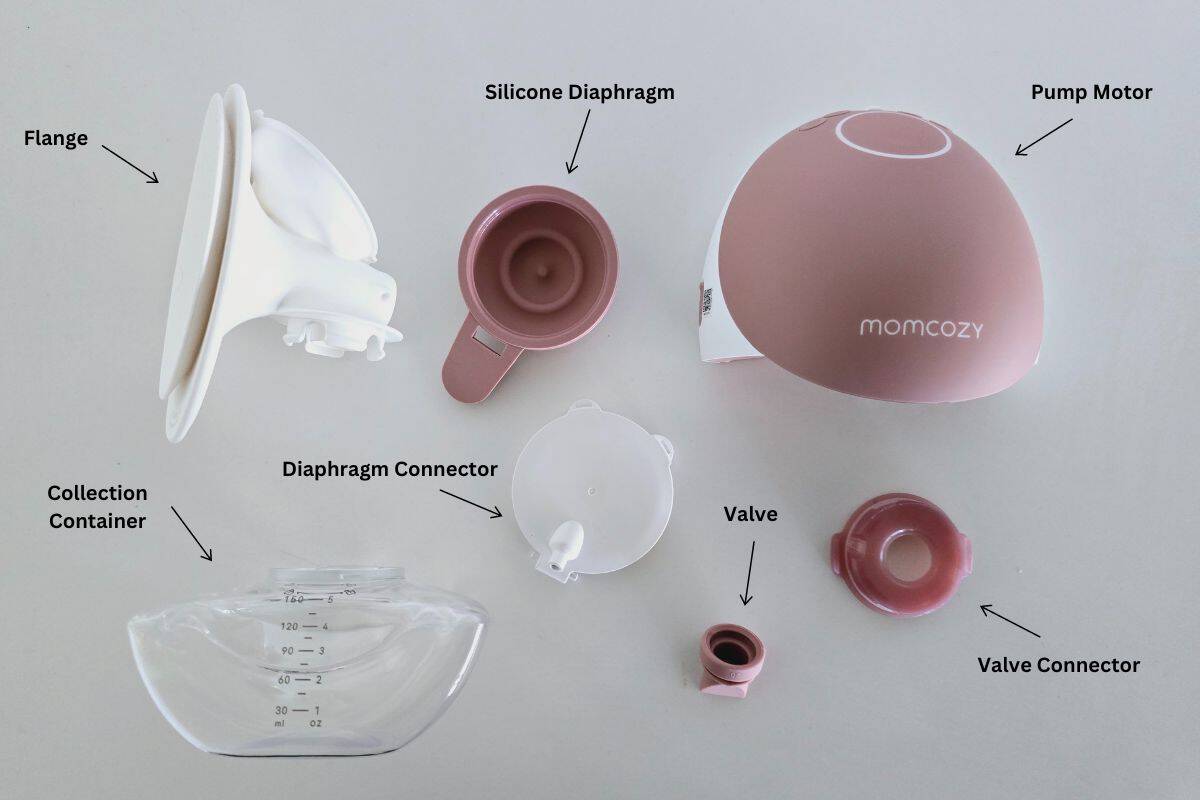
Photo credit: Pumping Milk
Momcozy M9 Components
Before you start using your Momcozy M9 breast pump, it’s important to familiarize yourself with its features and components to ensure a smooth pumping experience.
Here’s a breakdown of what you’ll find:
Breast Pump Motor: This is the core of the Momcozy M9, responsible for generating the suction needed for milk expression. It also houses the rechargeable battery, keeping the pump portable and convenient.
Milk Collection Containers: These containers collect the expressed breast milk. They can also be used to store your breast milk when the storage lid is on.
Flange: The flange is the funnel-shaped piece that fits over your breast. Proper sizing is crucial, and the M9 features soft silicone material for added comfort during use. You can also use smaller flange inserts to reduce the flange size if needed.
Diaphragm: This comes in 2 parts on the M9. A silicone membrane that connects to a hard plastic ‘lid’ that connects with the flange. The diaphragm is part of the pump’s valve system, playing a key role in maintaining consistent suction.
Valve: The valve is a one-way component that controls the milk flow from your breast into the collection cup, ensuring smooth and efficient expression. For the M9 it has two components. A duckbill valve that sits in a hard plastic connector that screws on top of the milk collection container.
USB Charging Cable: The M9 includes a USB cable to recharge your pump motor, keeping it ready for your next session.
Power Button: This button switches your pump on and off, making it simple to operate.
LCD Display: The clear LCD screen shows important details like suction strength, pumping mode, and battery life, so you’re always in control.
Suction and Mode Controls: You can easily adjust the suction level and switch between different pumping modes using these buttons, allowing you to customize your experience based on comfort and milk flow.
Momcozy App: The Momcozy M9 can be operated in real time via the Momcozy app. The Momcozy app is also an analysis tool where you can track and record your breast milk output and data.
You can operate your Momcozy M9 pump without the Momcozy app, but if you plan to use it, make sure you have downloaded your Momcozy App to your device:
Momcozy App – Google Play
Momcozy App – Apple Store
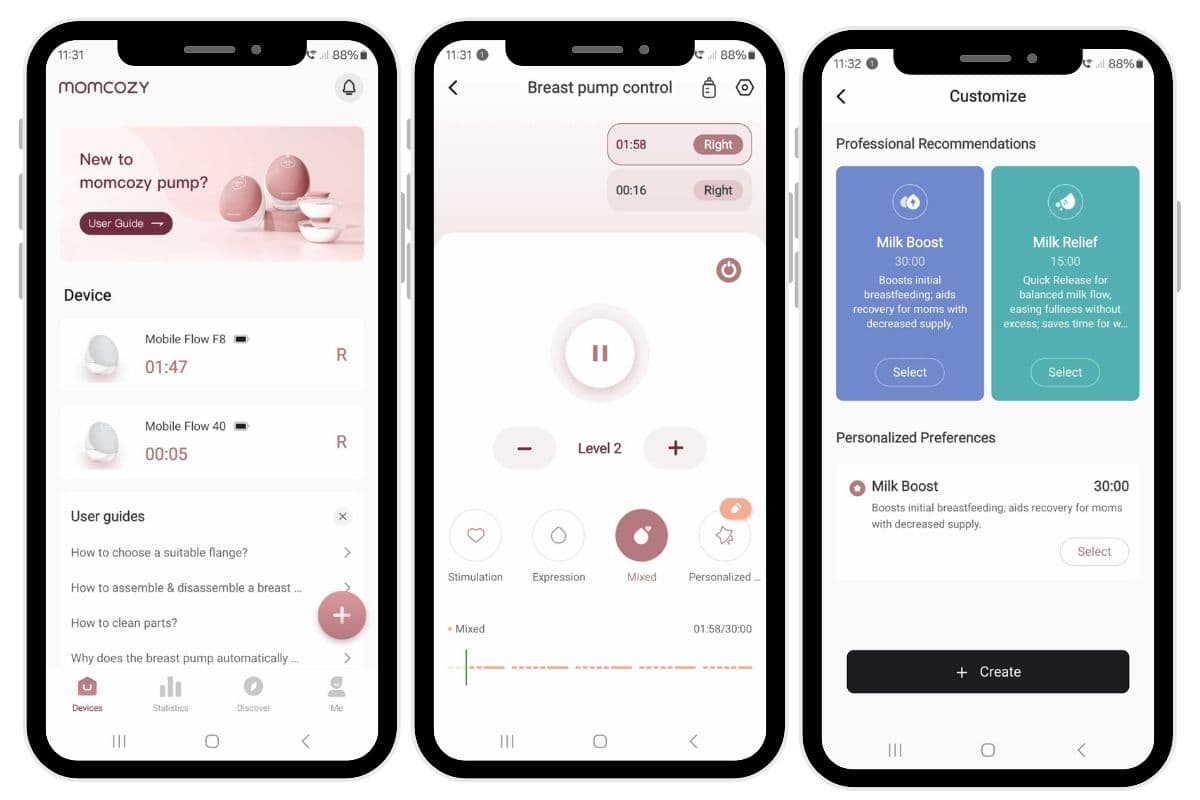
Photo credit: Pumping Milk
Momcozy M9 Assembly
Getting your Momcozy M9 breast pump ready is pretty straight forward once you get the hang of it, but it’s important to make sure it’s properly assembled for the best performance.
When you first unbox your new Momcozy M9, it will come pre-assembled, which can be helpful for visualizing how everything fits together. However, before you start pumping, it’s crucial to disassemble and sterilize the parts to maintain good hygiene.
Here are some quick tips to keep your pump clean and protect your milk:
- Wash your hands thoroughly before handling any pump parts.
- After each use, disassemble the parts that come into contact with milk, like the flanges, valves, membranes, and collection containers, and wash them with warm, soapy water. Rinse well, then air dry or use a clean towel.
- Sterilize these parts at least once a day by boiling them.
- Keep the motor unit dry and free from milk or moisture, as it’s not designed to get wet.
- When you’re done, store all components in a clean, dry spot to avoid contamination.
Once everything is washed and sterilized, it’s time to reassemble your Momcozy M9 for your next session.
Here’s a simple guide to get it all set up for smooth, worry-free pumping!
Step 1
Wash your hands thoroughly with soap and water before handling any components.
Step 2
Connect the duckbill valve to the collection cup connector. You’ll need to make sure that the hard plastic connector sits in the groove of the duckbill valve. The pointed, triangular side of the valve faces down into the collection container, so make sure you have it the correct way around.

Photo credit: Pumping Milk
Step 3
Connect the completed valve set to the collection container. Align the white arrow on the connector with the unlock icon on the collection container. The connector should then fit into the collection container. Once in place, rotate the connector/valve to the locked position.

Photo credit: Pumping Milk
Step 4
Connect your silicone diaphragm to the hard plastic connector.
Line up and place the circular piece of the silicone diaphragm over the inner side of the connector. Push the pieces together to ensure that they have a firm seal. The bugle side of the silicone diaphragm will face outwards, and the tail end will hang down over the small bar at the base of the connector.

Photo credit: Pumping Milk
Feed the bar of the connector into the slot of the silicone diaphragm. It should slot nicely into place and feel firmly attached.

Photo credit: Pumping Milk
Step 5
Connect the completed diaphragm to the flange.
Line up the top of the diaphragm (tail end points down) with the flange. The bugle of the silicone diaphragm fits snuggly into the semi-circular position on the flange.
Once lined up, push the hard plastic connector into place. You should hear it clip in.

Photo credit: Pumping Milk
Next push the tail end of the silicone diaphragm into the end of the flange tunnel. Make sure that it is firmly in place.

Photo credit: Pumping Milk
Step 6
Connect the mouth of the collection container to the base of the flange but simply pushing it into place firmly. You should hear it clip into place. Ensure that it is firmly secured.

Photo credit: Pumping Milk
Step 7
Attached the pump motor. It slides into place, and you will hear a clip once secured.

Photo credit: Pumping Milk
Step 8
Turn on the Momcozy M9 breast pump by pressing the power button. You will see the LCD screen light up.
Now, your breast pump is ready for pumping breast milk, but if you are wanting to use it in conjunction with the Momcozy App then follow the next step of instructions. If not, then skip this part and go straight to the settings.
Connect your Momcozy M9 breast pump to the Momcozy app
To connect your Momcozy M9 breast pump to the Momcozy app, follow these simple steps:
- Download the Momcozy App:
- Go to the App Store (for iPhone users) or Google Play Store (for Android users).
- Search for the “Momcozy” app and install it on your smartphone.
- Turn on Your Pump:
- Make sure your Momcozy M9 breast pump is fully charged or plugged in.
- Press the power button to turn it on.
- Enable Bluetooth:
- Ensure that the Bluetooth feature is turned on in your smartphone’s settings.
- The pump will automatically enter pairing mode when it’s on.
- Open the Momcozy App:
- Launch the Momcozy app and create an account if you’re a new user or log in if you already have an account.
- Pair the Pump with the App:
- In the app, navigate to the “Devices” section or look for a button that says “Add Device” or “Connect Pump.”
- The app will search for available Bluetooth devices. Select your Momcozy M9 from the list of nearby devices.
- Complete the Pairing Process:
- Follow the on-screen prompts to complete the pairing process.
- Once paired, you’ll be able to control suction levels, monitor your sessions, and adjust settings directly from the app.
Learn more about using the Momcozy App in this video:
Momcozy M9 Buttons and LED Screen
The Momcozy M9 breast pump is designed with simple, easy-to-use controls and a helpful LED screen to guide you through your pumping sessions. Here’s a friendly guide to get you familiar with the buttons and display:
Power Button
- This button, marked with the power symbol, is your go-to for turning the pump on and off or pausing it.
- To turn it on or off: Press and hold the power button.
- To pause the pump: Just press the button briefly. You can press any button to resume where you left off.
Suction Level Control
- The LED screen shows your current suction level, which you can adjust to suit your comfort and milk flow.
- Press the + button to increase suction.
- Press the – button to decrease suction.
- The suction level will appear as a number on the screen.
Don’t hesitate to try different levels until you find what works best for you. Start with a lower setting and gradually increase it. Remember, the highest setting isn’t always the most comfortable or effective—it’s all about finding your sweet spot.
Pumping Modes
The Momcozy M9 offers three different modes to support you throughout your pumping session:
- Stimulation Mode: Helps encourage letdown.
- Expression Mode: For efficient milk extraction.
- Mixed Mode: A combination of both stimulation and expression with a unique vibration feature.
The screen will display symbols for each mode:
- A heart represents stimulation mode.
- A droplet represents expression mode.
- Both symbols together mean the pump is in mixed mode.
You can easily switch between modes by pressing the circular arrow button.

Photo credit: Pumping Milk
Left to Right
On your pump you will notice a L< > R button. This is for selecting a breast side when using your Momcozy App. This will not matter when using your pump without the App.
Battery Status
- You’ll find the battery level at the bottom of the LED screen. A fully charged pump shows three solid bars, while a low battery will flash, reminding you it’s time to recharge.
Error Messages
- If there’s an issue, such as a blocked tube or low battery, the screen will alert you with an error message. No worries—just follow the message and you’ll be back on track in no time.
Using the Momcozy M9
If you are using your pump with the Momcozy App, I highly recommend watching my video on How To Use Momcozy Pump App as I won’t go into the detail of the Momcozy App settings in this post.
Once you’re ready to start pumping with the Momcozy M9, the process is quite simple. Here’s a step-by-step guide to get you going:
Step 1: Wash Your Hands
Start by thoroughly washing your hands with soap and water to maintain cleanliness.
Step 2: Assemble the Pump
Ensure all parts are sterilized and correctly assembled before use.
Step 3: Position the Flange
Place the flange (and insert, if needed) over your breast, making sure your nipple is centered and moves freely inside the shield. Gently press the flange against your breast to create a good seal.

Photo credit: Pumping Milk
Step 4: Adjust Your Pumping Bra
One of the best features of the Momcozy M9 is its wearable design. Position the pump securely in your bra, making sure it fits snugly. A stretchy, well-fitted bra will hold the pump in place comfortably – not too tight, not too loose.
Step 5: Turn On the Pump
Press the power button to switch on your Momcozy M9. The LED screen will light up, showing the current settings.
You can also operate your Momcozy M9 via the Momcozy App if you choose to. Just ensure your pump is turned on and connected to the Momcozy App.
Step 6: Select Your Pumping Mode and Suction Level
Start with massage mode to stimulate letdown. A level 2 or 3 for the first two minutes is a good place to begin.
Once your milk starts flowing, switch to expression or mixed mode for efficient milk removal. Again, start with a low suction setting and slowly increase it until you find a comfortable and effective level.
You should feel a gentle pull, not pain. Use these modes for about 15 to 20 minutes.
Step 7: Monitor Your Session
Keep an eye on your milk flow and pump performance throughout the session to troubleshoot any issues, like low output or weak suction.
Step 8: Turn Off the Pump
When you’re done, press the power button to turn off the pump.
Step 9: Remove the Pump
Gently break the seal between the flange and your breast with your fingers, then tilt forward slightly to remove the pump without spilling.
Step 10: Milk Storage
One thing I love about the Momcozy M9 is that you can store your breast milk directly in the collection container if you choose. To do this simply remove the collection container by gently pulling it from the flange. Then attach the storage lid.
If you prefer not to store your milk in the collection container, you can pour it into a clean storage container of your choice.
The flat base of the M9 allows it to stand upright while you handle the second pump without losing any milk.

Photo credit: Pumping Milk
Step 11: Clean Your Pump
After each session, wash all parts that came into contact with milk to maintain hygiene. Sterilize your pump at least once a day.
Step 12: Check Battery Levels
Before storing, check the battery life. If it’s low, plug it in to recharge so it’s ready for next time. The charging port is located at the back of the motor.
Step 13: Store the Pump
After cleaning, cover the flanges and store the pump in the hard-shell carry case, so it’s ready for your next use.
By following these steps, you’ll have a smooth and efficient pumping experience with your Momcozy M9!
Momcozy M9 Replacement Parts
To keep your Momcozy M9 breast pump running smoothly, certain parts will need regular replacement. These primarily include the silicone valves, diaphragms, and flange inserts. Over time, these components can wear out and affect the pump’s suction and efficiency.
If you notice a decrease in suction, the first step is to check the parts for signs of wear, stretching, or damage, especially the valves. Replacing worn parts will help restore optimal performance.
Momcozy recommends replacing the silicone parts, such as valves and diaphragms, every 1-3 months, depending on usage. Other accessories should be replaced as needed based on wear and tear.
Here’s a list of available replacement parts for the Momcozy M9:
- Valve (Double Layered)
- Diaphragm (Double Layered)
- 15mm Flange Insert
- 17mm Flange Insert
- 19mm Flange Insert
- 21mm Flange Insert
- 24mm Flange
- 27mm Flange
- Milk Container with Lid
Regularly checking and replacing these parts will help maintain both the pump’s performance and your comfort. You can learn more in my guide on how often should you replace breast pump parts!
Troubleshooting Common Issues with the Momcozy M9
While the Momcozy M9 is designed to be a reliable and user-friendly breast pump, you may occasionally encounter some common issues. Don’t worry—most of these can be easily resolved with a little troubleshooting. Here’s a quick guide to help you out:
Low Milk Output
- Check Your Breast Shield Size: Ensure the flange size matches your nipple. If it’s too big or too small, it can affect milk flow.
- Adjust Suction and Mode: Play around with the suction levels and pumping modes to find the most comfortable and effective settings for you.
- Breast Massage: Use gentle breast compressions or massage while pumping to help encourage better milk flow.
- Stay Hydrated and Rested: Remember that drinking plenty of water, eating a balanced diet, and getting enough rest can all positively impact your milk production.
Pain or Discomfort
- Ensure Proper Shield Fit: The flange should fit snugly but not be too tight. If it’s uncomfortable, try a different size.
- Lower the Suction: If it feels too intense, reduce the suction level for a more comfortable experience.
- Use Nipple Cream: Consider applying a lanolin-based nipple cream or using a warm compress before pumping to ease discomfort.
- Adjust Breast Positioning: Make sure your breast and nipple are well-centered in the shield to prevent irritation.
Loss of Suction
- Check Pump Assembly: Ensure all parts, especially the valves and diaphragms, are properly assembled and securely sealed.
- Replace Worn Parts: If your valves or membranes seem stretched or worn, swap them out for new ones.
- Ensure a Good Seal: Double-check that the flanges are attached securely to your breasts to maintain suction.
Milk Overflow
- Monitor Milk Flow: Keep an eye on the amount of milk in the collection cups and stop pumping when you reach about 4 oz to avoid overflow.
- Watch the Pump’s Angle: Make sure the pump is angled correctly to prevent milk from spilling.
When to Reach Out for Help
If you’ve tried troubleshooting and are still experiencing issues, consult the Momcozy M9 manual for additional guidance. For further help, Momcozy’s customer support team is available to assist with any questions, advice on replacement parts, and warranty information.
You can contact them at support@momcozy.com for expert help!
Final Thoughts on How To Use Momcozy M9
The Momcozy M9 breast pump is thoughtfully designed for convenience and comfort, making it an excellent choice for busy moms.
Whether you’re new to pumping or upgrading from another pump, getting familiar with its features will ensure a smoother and more effective experience.
By following the steps for assembly, operation, and maintenance, you can maximize its benefits and ensure a smooth pumping routine. Remember to regularly clean and check the pump, and to troubleshoot any issues that arise to maintain its performance.
And if you encounter any issues or need help, don’t hesitate to reach out to Momcozy customer support.
By following these tips and paying attention to your needs, the Momcozy M9 will make pumping more manageable, allowing you to spend more time focusing on your baby.


