How To Use Eufy S1 Pro Breast Pump
If you’re using the Eufy S1 Pro for the first time, this step-by-step guide shows you exactly how to set it up, use each pumping mode, pair the app, clean the parts, and troubleshoot common issues.
This guide focuses on how to use the Eufy S1 Pro correctly for everyday pumping, whether you’re pumping at home, work, or on the go.
Quick Start: How to Use the Eufy S1 Pro
- Fully charge the pumps and charging case
- Assemble the flange, valve, and milk collector
- Insert the pump into your bra and ensure a snug seal
- Turn on the pump and start in stimulation mode
- Switch to expression mode once letdown begins
Prefer to watch? Check out my full Eufy S1 Pro how-to video above, then scroll down for the detailed written instructions.
Editor’s note: Pumping Milk is reader-supported, meaning, at no cost to you, I may earn a commission if you buy after clicking an affiliate link. Learn More.
How to Use the Eufy S1 Pro Breast Pump (Step-by-Step)
Below, I’ll walk you through everything you need to know to use the Eufy S1 Pro confidently, from unboxing to your first pumping session.
What’s Included with the Eufy S1 Pro Breast Pump
Before you start pumping, it’s worth taking a moment to check everything included with the Eufy S1 Pro breast pump. If you’re still deciding whether this pump is right for you, you can also read my full Eufy S1 Pro breast pump review for a deeper look at performance, comfort, and daily use.

Photo credit: Pumping Milk
If this is your first time using a wearable breast pump, reviewing all included parts makes setup faster and helps avoid common assembly mistakes.
What’s included in the box:
- 2 × Pump motors
- 2 × Milk collector cups
- 2 × 24mm flanges
- 2 × Diaphragms
- 4 × Duckbill valves
- 6 × Flange inserts (21mm, 19mm, 17mm)
- 1 × Magnetic charging cable
- 1 × USB charging cable
- 1 × Charging case
- 2 × Dust covers
Note: If you purchased the standard Eufy S1 (not the Pro version), the charging case is not included.
If your pump was purchased brand new and anything is missing, contact Eufy customer support as soon as possible. They are generally quick to replace missing or faulty components.
If you’re using a second hand pump, it’s best to replace all silicone parts before use, including the duckbill valves, diaphragms, flanges, and inserts. These parts wear down over time and can affect suction, milk output, and hygiene. Starting with fresh silicone parts helps ensure better performance and peace of mind.
How To Assemble the Eufy S1 Pro
Getting your Eufy S1 Pro wearable breast pump setup is simple once you’re familiar with the parts, but making sure everything is properly assembled is key for strong suction, leak-free pumping, and overall performance.
When you first unbox your Eufy S1 Pro, it may come partially assembled, which can be helpful in showing how the pieces fit together. However, before your first use, it’s important to fully disassemble all the parts and give them a thorough clean to maintain proper hygiene.
Here are my tips to keep your pump clean and help preserve milk quality:
- Clean Hands First: Always wash your hands well before handling any pump parts.
- Disassemble After Each Use: Take apart all components that come in contact with milk—such as the flange, valve, diaphragm, and collection cup—and wash them in warm, soapy water. Rinse well and allow them to air dry completely.
- Daily Sterilization: Sterilize all milk-contact parts at least once a day by boiling them, using a steam sterilizer, or a cold water sterilizing solutions such as Milton.
- Keep the Motor Dry: The pump motor should never be submerged or rinsed under water. Wipe it gently with a clean, dry cloth if needed.
- Store Carefully: Once everything is clean and dry, reassemble or store your parts in a clean, dust-free container until your next session.
Once you’ve completed the cleaning and drying process, you’re ready to reassemble your Eufy S1 Pro for your next pumping session.
Follow these easy Eufy S1 Pro instructions below to get your pump set up and ensure a smooth, comfortable start.
Step 1
Wash your hands thoroughly with soap and water before handling any pump parts.
Step 2
Take the duckbill valve and push it into the circular slot at the bottom of the collection cup. It should fit snugly. Give it a gentle tug to confirm it’s secure.
You’ll want the flap of the valve to sit flat and aligned with the base of the cup—this helps your milk flow smoothly and prevents buildup inside the valve.

Photo credit: Pumping Milk
Step 3
Insert the diaphragm into the opening at the top of the collection cup. One side of the diaphragm is flat and the other has a dimple—make sure the dimple faces inward, toward the milk collector.
Press it down firmly so it’s flush with the rim. A secure diaphragm helps maintain suction and prevents milk from reaching the motor.

Photo credit: Pumping Milk
Step 4
Now take your flange and line it up with the collection cup. Slide the circular base of the flange into the top opening. Make sure the small pouring spout lines up with the correct section on the cup, and check that the sensor connector is pushed through properly.

Photo credit: Pumping Milk
This sensor connector is what links to the heating pad in your pump motor—so it’s important that it’s fitted correctly to allow the heating function to work.
Step 5
Push the flange down firmly around the rim of the collection cup. You may need to apply even pressure around the entire edge until it clicks into place and forms a secure seal.
Don’t rush this step—a loose or uneven flange fit is one of the most common causes of leaks or poor suction. I like to run my fingers around the edge at the end to check that everything is tightly sealed.

Photo credit: Pumping Milk
Step 6
Finally, attach the pump motor. Line up the motor with the top of the diaphragm and gently press it down until it clicks into place.
You’ll notice small connector points on the motor that need to align with the heating pad sensors on the collection cup. Once everything is clicked together securely, your Eufy S1 Pro is fully assembled and ready for use.

Photo credit: Pumping Milk
Connect Your Eufy S1 Pro Breast Pump to the Eufy Baby App
To get the most out of your Eufy S1 Pro breast pump, I highly recommend using the Eufy Baby app. This lets you control settings remotely, track your sessions, adjust heat levels, and more—right from your phone.
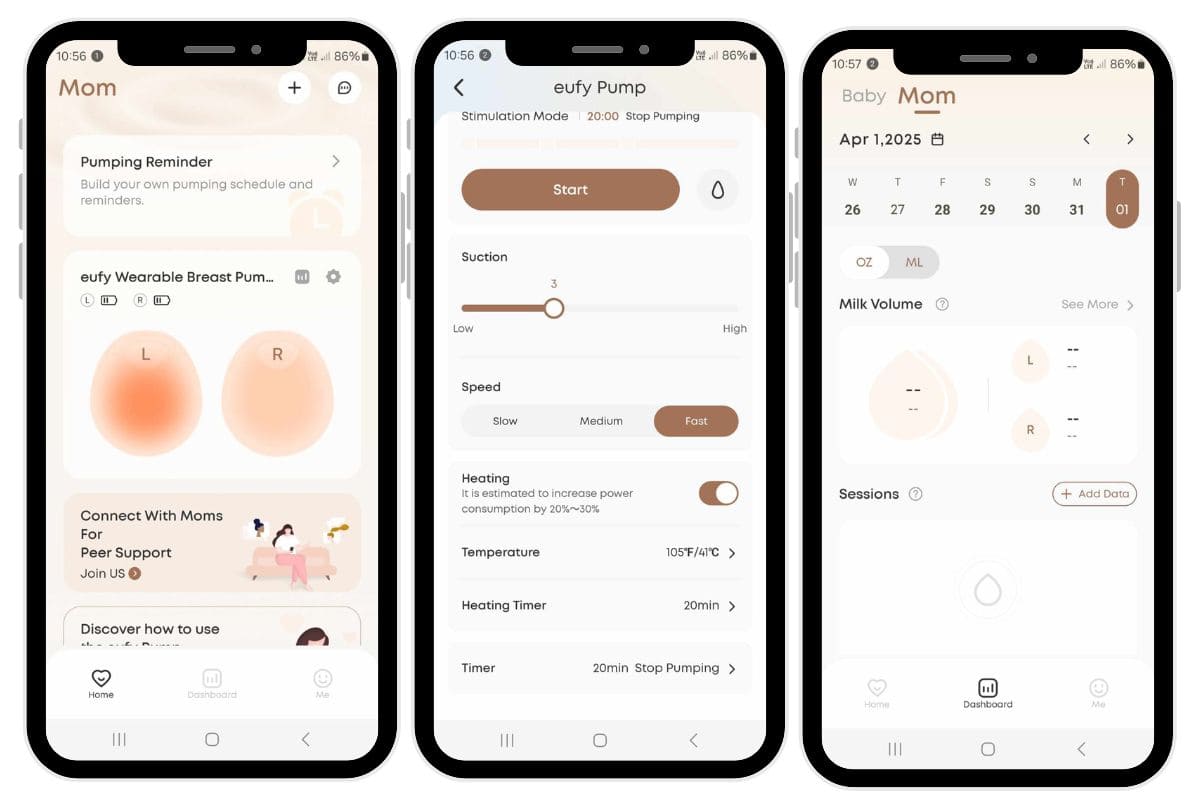
Photo credit: Pumping Milk
Here’s how to connect your Eufy S1 Pro to the Eufy Baby app:
Download the Eufy Baby App:
- Open the App Store (iPhone) or Google Play Store (Android).
- Search for “Eufy Baby” and download the app to your smartphone.
Turn On Your Pump:
- Make sure your Eufy S1 Pro is fully charged.
- Press and hold the power button on the pump to turn it on.
Enable Bluetooth:
- Go into your phone’s settings and ensure Bluetooth is turned on.
- Your pump will automatically enter pairing mode when it powers on.
Open the Eufy Baby App:
- Launch the app and create a new account, or log in if you already have one.
Pair the Pump with the App:
- In the app, go to the “Devices” section or select “Add Device.”
- The app will scan for nearby Bluetooth devices—select your Eufy S1 Pro when it appears in the list.
Complete the Pairing Process:
- Follow the prompts in the app to finish setup.
- Once connected, you’ll be able to:
- Switch between pumping modes
- Adjust suction levels
- Set timers for heat and pumping
- Monitor your session data
- Track milk output per breast (L/R)
Want to see it in action? Check out my full How to Use Eufy S1 Pro video for a walkthrough of the app controls and settings.
Eufy S1 Pro Buttons and LED Screen
The Eufy S1 Pro is designed to be intuitive and user-friendly, with a compact control panel and LED screen that lets you manage your pumping session without needing your phone—perfect when you want quick access on the go.
Here’s a breakdown of each button and what it controls:
Power Button
- Press and hold to turn your pump on or off.
- Quick press to pause or resume your pumping session.
When you first turn on the pump, it will begin in pause mode—so don’t forget to press again to start pumping!
Mode Button
- Switches between pumping modes:
- Stimulation mode (waves icon): short, quick suctions to help trigger letdown.
- Expression mode (droplet icon): deeper, slower suction for milk removal.
If you’re unsure which mode you’re in, just check the icon on the LED screen at the top.
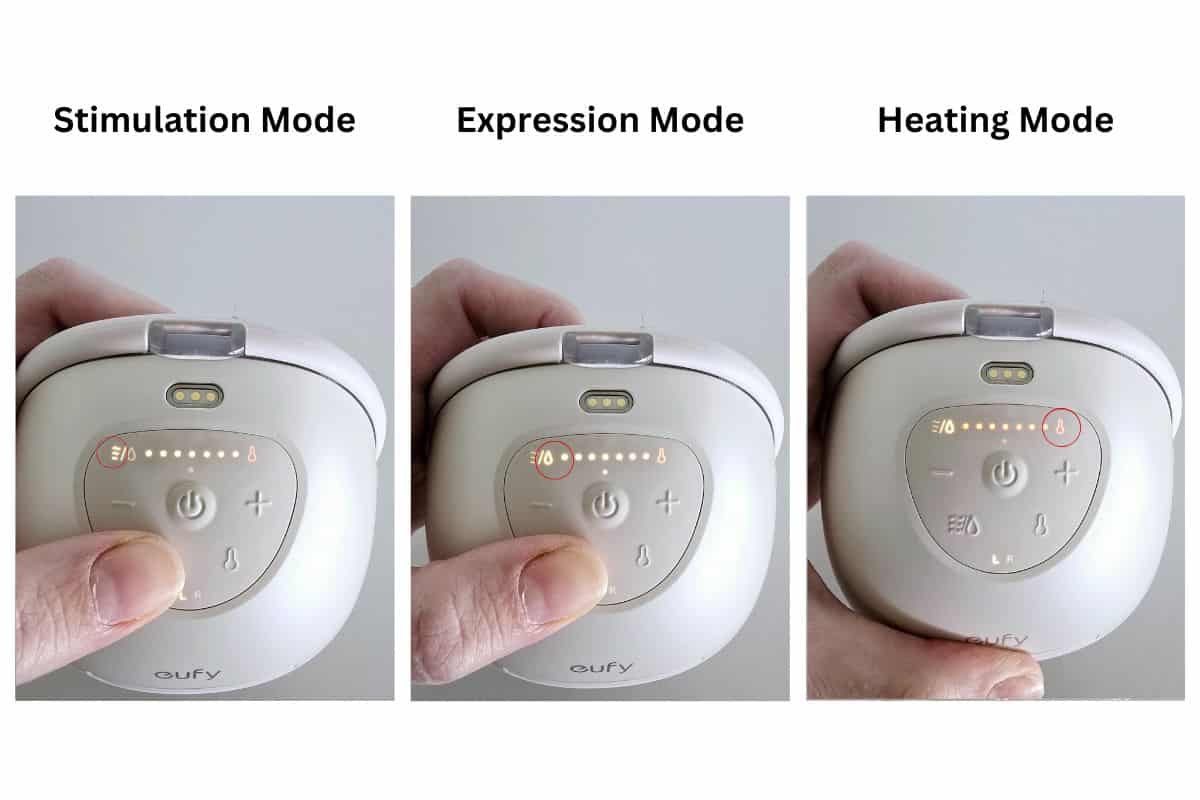
Photo credit: Pumping Milk
+ / – Buttons
- Adjust the suction strength up or down across 7 levels.
- Level is shown by a number on the screen, along with white indicator dots near the top.
Start low (around level 2 or 3), and gradually increase if needed. You want a strong but comfortable suction—not painful.
Heat Button
- Tap to turn the built-in heating pad on or off.
- Adjust the temperature by pressing + / – after selecting heat mode.
- The temperature ranges from 35°C to 41°C (95°F to 105°F).
You’ll feel warmth in the flange area, which helps encourage letdown and adds comfort to your session.
L/R Button (App Use Only)
This button lets you assign the pump to your left (L) or right (R) breast inside the Eufy Baby app. It’s helpful for tracking milk output per side or syncing/unsyncing two pumps if you’re double pumping.
LED Display Overview
Your Eufy S1 Pro LED screen shows:
- Current mode icon (wave or droplet)
- Suction level (number and dots)
- Heat activation and temperature
- Battery status (bars)
- Timer countdown (if set via the app)
- L/R indicator (when connected to app)
The screen will dim automatically after 60 seconds to preserve battery and offer more discretion. Simply tap any button to wake it up again.
Using the Eufy S1 Pro Breast Pump
Once your Eufy S1 Pro is fully assembled and properly positioned, you’re ready to begin your pumping session.
Whether you’re using it for the first time or need a refresher, these step-by-step instructions show exactly how to wear the pump, adjust settings, and use the Eufy S1 Pro comfortably and effectively.
Step 1: Wash Your Hands
Before handling your pump or positioning the flange, make sure your hands are clean. This helps maintain hygiene and protect your breast milk from contamination.
Step 2: Check Your Flange Fit
Your pump comes with a 24mm flange and three inserts (21mm, 19mm, 17mm) to help you find the best fit. If the flange tunnel feels too large, simply insert the correct-size silicone insert into the flange before use.
Step 3: Position the Pump
Center your nipple within the flange tunnel. Then place the assembled pump against your breast and adjust your pumping bra to hold it snugly in place.
You want it to feel secure, but not too tight—compression can impact milk flow or cause discomfort.
Step 4: Power On
To turn on your Eufy S1 Pro, press and hold the power button. The LED display will light up. A quick press will pause or resume the session as needed.
Step 5: Select a Pumping Mode
You can use the built-in control panel on the Eufy S1 Pro breast pump or connect to the Eufy Baby app for more control. From the pump’s interface:
- Stimulation mode (waves icon): Use this at the start to trigger letdown. It delivers short, quick suctions.
- Expression mode (droplet icon): Once letdown occurs, switch to this mode for deeper, slower suctions to help express milk more efficiently.
You can toggle between modes using the mode button on the front of the pump.
Step 6: Adjust Suction Strength
Use the plus (+) and minus (–) buttons to set your desired suction level. The S1 Pro has seven levels of suction strength.
I recommend starting at level 2 or 3 and increasing only if you feel comfortable. You should feel a strong but gentle pull—never pain.
Step 7: Use the Heating Feature (Optional)
The Eufy S1 Pro includes a built-in warming feature that gently heats the flange area to encourage letdown and comfort. Tap the heat button to turn it on.
You can adjust the temperature between 35°C and 41°C (95°F to 105°F) directly on the pump or through the app.
You can also set a heat timer via the app if you’d like the warmth to turn off automatically after a certain time.
Step 8: Monitor and Adjust
Throughout your session, keep an eye on your comfort and output. You can make adjustments to suction level or mode at any time. If you’re using the app, you can also track your session length and milk output per side.
The left (L) and right (R) indicators on the pump are for app tracking purposes—so you can log output per breast or run synced/unlinked settings if double pumping.
Step 9: Finish Your Session
When you’re done pumping, press and hold the power button to turn off the pump.
Step 10: Remove the Pump
Lean forward slightly and gently break the seal between the flange and your breast with a finger before lifting the pump away.
Avoid pulling the pump straight off your breast without breaking the seal—this can be uncomfortable and may cause nipple pain.
Step 11: Transfer and Store Your Milk
Use the built-in pouring spout at the top of the collection cup to carefully transfer your milk into a clean storage bottle or bag.
If you’re new to milk storage, I recommend checking out my how to store breast milk guide for helpful tips.
Step 12: Clean Your Pump
After each session, disassemble and wash all parts that came into contact with milk. Let everything air dry completely before storing or reassembling.
The pump motor and charging case should never be submerged or rinsed—just wipe them down with a clean, dry cloth if needed.
Step 13: Recharge If Needed
Check your battery level before putting your pump away. You can either use the magnetic USB charger or pop your pump into the charging case (Pro version only). A small light on the case will indicate when the pump is charging.

Photo credit: Pumping Milk
Eufy S1 Pro Components
Understanding how each Eufy S1 Pro component works can help you troubleshoot issues, maintain strong suction, and keep your pump performing at its best over time. This wearable pump is designed to be compact and discreet, with thoughtfully engineered components that support both comfort and performance.
Here’s a breakdown of the key parts that make up the Eufy S1 Pro breast pump:
Pump Motor
This is the core of your pump—the part that powers the suction and controls all pumping functions. It’s lightweight and clips directly onto the top of the milk collector cup. It also connects to the internal heating pad and works with the Eufy Baby app for added control.
Flange
This is the funnel-shaped part that rests against your breast. It forms a seal and directs suction to the nipple. The S1 Pro comes with a standard 24mm flange, but smaller flange inserts (17mm, 19mm, and 21mm) are included to help you find your best fit.
Diaphragm
A soft, flexible barrier that plays a crucial role in creating and maintaining suction. It also prevents milk from entering the motor, keeping the pump hygienic and functioning properly.
Duckbill Valve
This one-way silicone valve is attached to the bottom of the collection cup. It controls the flow of milk into the cup and helps prevent backflow, ensuring milk stays where it should.
Milk Collector Cup
This is the wearable cup that holds your expressed milk during a session. It’s designed to fit discreetly in your bra and has a generous capacity of approximately 5oz (150ml).
Heating Pad (Built-In)
Located behind the flange, the heating element provides gentle warmth to help stimulate letdown and improve comfort. You can control the temperature manually or via the Eufy Baby app.
Magnetic Charger & Charging Case
The magnetic USB charger lets you charge your pump directly, while the charging case (included with the Pro version) makes it even easier to power up on the go. The case can hold a charge for multiple sessions, which is especially useful for travel or workdays.
Each of these parts is designed to work seamlessly together, giving you a hands-free pumping experience that’s quiet, effective, and customizable.
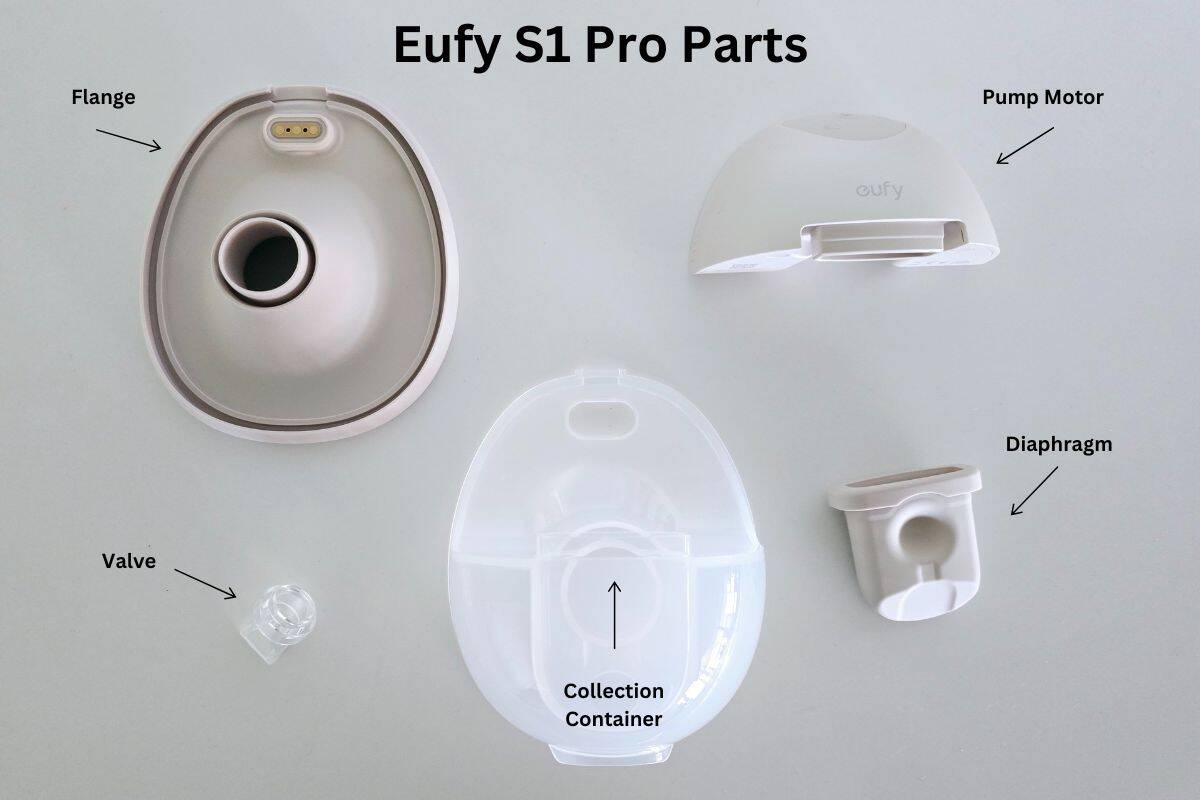
Photo credit: Pumping Milk
Eufy S1 Pro Replacement Parts
Over time, some parts of your Eufy S1 Pro breast pump may need to be replaced to keep your pump working efficiently and comfortably.
If you’re experiencing a loss of suction, reduced milk output, or noticing signs of wear on your pump parts—especially the soft silicone components—it’s a good idea to inspect and replace them. Worn or stretched parts can impact your pump’s performance and overall hygiene.
For regular pumping, silicone parts like duckbill valves and diaphragms typically need replacing every 1–3 months, depending on frequency of use and cleaning method. Other components should be swapped out as needed based on visible damage or wear.
You can find official replacement parts for the Eufy S1 Pro through authorized retailers. I’ve linked commonly replaced components below for convenience.
- Duckbill Valves
- Diaphragms
- 24mm Flanges
- 27mm Flanges
- Flange Inserts (15mm, 17mm, 19mm, 21mm)
- Milk Collector Cups
- Pour Spout Caps
- Magnetic Charging Cable
- Dust Covers
If you notice reduced suction, shorter sessions, or leaking, worn silicone components are often the first thing to check. If you notice reduced suction, shorter sessions, or leaking, worn silicone components are often the first thing to check.
You can learn more in my full guide on replacing breast pump parts.
Troubleshooting Common Issues with the Eufy S1 Pro
Even with a high-quality wearable pump like the Eufy S1 Pro, occasional issues can come up. The good news is that most are easy to fix with a quick check or adjustment.
Below are the most common Eufy S1 Pro problems and how to fix them.
Incorrect Flange Size
Using the wrong flange size is one of the most common causes of discomfort, poor suction, and low milk output with the Eufy S1 Pro.
If the standard 24mm flange feels uncomfortable or you’re not getting good output, try one of the included silicone inserts (17mm, 19mm, or 21mm). A proper fit allows your nipple to move freely in the tunnel without rubbing or pulling in excess areola.
If pumping feels painful, suction seems weak, or output is inconsistent, flange sizing is the first thing to reassess.
Low or No Suction
- Check the duckbill valve and diaphragm for wear, stretching, or tears. These silicone parts typically need replacing every 1–3 months.
- Make sure all parts are fully assembled and sealed, especially the flange and diaphragm.
- Confirm the flange is centered over your nipple and creating a complete seal.
Milk Leaking During Pumping
- Ensure the flange is pressed firmly into the collection cup with no gaps.
- Check that the pour spout cap is securely attached.
- Avoid overfilling the milk collector cup, which can cause leaks or backflow.
Pump Will Not Turn On
- Fully charge the pump using the magnetic charger or charging case.
- Check for moisture or debris around the power button.
- Press and hold the power button for a few seconds — a quick press only pauses or resumes pumping.
Heating Pad Not Working
- Make sure the sensor connector is fully pushed through the flange during assembly.
- Try adjusting heat settings through the Eufy Baby app to confirm responsiveness.
Suction Feels Uncomfortable
- Reassess flange size and try a different insert if needed.
- Lower the suction level and increase gradually until suction feels strong but comfortable.
Loud or Unusual Noise
- Disassemble and reassemble the pump to ensure all parts are aligned correctly.
- Inspect the duckbill valve — a worn or misaligned valve can cause rattling or air noise.
Still Having Issues?
If problems continue after troubleshooting, consult the Eufy S1 Pro user manual or contact Eufy customer support. They can assist with setup issues, warranty concerns, or replacement parts.
Final Thoughts on Using the Eufy S1 Pro Breast Pump
The Eufy S1 Pro is a powerful wearable breast pump designed to make pumping more comfortable, efficient, and truly hands-free. With app-controlled customization, built-in heat support, and easy-to-clean parts, it’s well suited for pumping at home, at work, or on the go.
Taking the time to assemble the pump correctly, choose the right flange size, and keep all parts clean and well maintained can make a noticeable difference in comfort, suction, and milk output. Small setup details matter, especially if you pump regularly or rely on a wearable pump as part of your daily routine.
If you’re looking to build a more consistent pumping routine, you may also find my guide on creating a pumping schedule helpful. It covers practical tips to support milk supply, stay organized, and make pumping fit more smoothly into everyday life.
Related Pumping Guides
If you’re using the Eufy S1 Pro as part of your regular pumping routine, these guides can help you get the most out of it:
- Newborn Pumping Schedule – How Often to Pump & What to Expect – A practical guide to building a consistent pumping routine
- How to Choose Breast Pump Flange Size – Learn how proper sizing affects comfort, suction, and milk output

Photo credit: Pumping Milk


